Spaces Assets
Each asset within the Spaces framework is equipped with two distinct types of scripts, which can be found in the following directory: ./Assets/Spaces/Scripts/Assets/:
Script Types
1. Tracker
The Tracker script is designed to be attached to the asset's GameObject. Its primary functions include:
- Tracking View Time: Monitors how long the asset has been viewed.
- Asset Clicks: Records users click in the asset.
- Visibility Count: Keeps track of how many times the asset has been displayed to users.
2. Loader
The Loader scripts are a collection of scripts that should be attached to various GameObjects associated with the same asset. These scripts are responsible for:
- Dynamic Loading: Ensuring that the asset is loaded efficiently during active brand campaigns.
Implementation Guidelines
In most scenarios, you can simply attach the Tracker and Loader scripts to their respective GameObjects without any additional modifications. However, in certain cases, manual code adjustments may be necessary to align with your specific game requirements.
Tracker
Standard Drag-Drop
Each asset can be either a Prefab or a GameObject that displays or renders the asset on the screen. The visibility of the asset depends on whether its GameObject is active; if it's active, the asset is displayed; if not, it becomes invisible.
-
Attach the Tracker Script:
- Drag the appropriate Tracker script from the following directory:
./Spaces/Scripts/Assets/Trackers - Attach it to the relevant GameObject.
- Drag the appropriate Tracker script from the following directory:
-
Set Up for 2D Assets:
- If your asset is a 2D element (such as a UI component or part of a 2D game), make sure to set
is2Dtotrue.
- If your asset is a 2D element (such as a UI component or part of a 2D game), make sure to set
-
Collider Settings:
- If the GameObject you are attaching the script to does not have any Colliders covering its entire area, set
addCollidertotrue.
- If the GameObject you are attaching the script to does not have any Colliders covering its entire area, set
-
Pass the Camera
- Pass the Camera Object which is responsible for showing the asset in the scene.
-
Set Near & Far Plane Values
- Pass the Near & Far Clipping Plane Values that you use in your Camera.
![]()
![]()
Your Tracker script will look similar to this
using UnityEngine;
using Spaces.Unity.WebGl.Sdk.V2;

public class SpacesCoinTracker : MonoBehaviour
{
    public string assetId = SpacesAssets.GetAssetId("Coin");
    private SpacesEngine spacesEngine;
    public bool is2D;
    public bool addCollider;
    public Camera spacesCamera;
    public float nearPlaneValue;
    public float farPlaneValue;


    // Start is called before the first frame update
    void Start()
    {
        spacesEngine = new SpacesEngine(SpacesController.GetAPIKey(),SpacesController.env,SpacesController.inEditor);
        spacesEngine.InitializeAsset(gameObject,is2D,addCollider);
    }

    // Update is called once per frame
    void Update()
    {
        if(spacesCamera!=null && assetId!=null && spacesEngine!=null){
            spacesEngine.AssetUpdate(gameObject,spacesCamera,assetId,nearPlaneValue,farPlaneValue,is2D);
        }
    }

    void OnDisable()
    {
        if(assetId!=null && spacesEngine!=null){
            spacesEngine.AssetDisabled(assetId);
        }
    }

    void OnApplicationFocus(bool focus)
    {
        if (focus == false && assetId!=null && spacesEngine!=null)
        {
            spacesEngine.AssetDisabled(assetId);
        }
    }

    void OnDestroy()
    {
        if (assetId!=null && spacesEngine!=null)
        {
            spacesEngine.AssetDestroyed(assetId);
        }
    }

}
Let me explain what each endpoint does for a better understanding
spacesEngine.InitializeAsset(gameObject,is2D,addCollider);
- Purpose: Initializes the SpacesAsset.
- Usage: This method is called only once during the lifecycle of the GameObject to which the Tracker Script is attached.
spacesEngine.AssetUpdate(gameObject,spacesCamera,assetId,nearPlaneValue,farPlaneValue,is2D);
- Purpose: Tracks the asset while the GameObject is active.
- Usage: This method is called in every frame when the asset is visible in the game.
Note: Adjust the nearPlaneValue and farPlaneValue parameters based on your game's camera settings. These represent the near and far clipping plane values. It's best practice to set optimal clipping planes so that the asset is considered visible only when it is close enough and large enough for users to see.
spacesEngine.AssetDisabled(assetId);
- Purpose: Temporarily disables asset tracking.
- Usage: This method is called whenever the GameObject or asset becomes invisible or inactive in the game.
Custom Addition
In some scenarios, you might have to do somes changes to the script and assign values in runtime etc..
-
You need to ensure that the respective asset tracker script, is attached to the asset Gameobject. You can either do it via editor or in runtime depending on how you handle it.
-
If you are loading assets in runtime dynamically, ensure you set the
assetIdin the script. You can fetch assetId by passing the name in this functionSpacesAssets.GetAssetId("your-asset-name")in runtime.
Example
You can set the asset for the below in runtime by accessing the GetAssetId() function in the asset gameobject and then by running tracker.assetId = SpacesAssets.GetAssetId("Coin").
GameObject newObject = Instantiate(prefab); //Your appropriate gameObject
SpacesTracker tracker = newObject.AddComponent<SpacesTracker>();
tracker.assetId = SpacesAssets.GetAssetId("Coin"); //you need to assign the assetId to the script
tracker.is2D = true; //you can set appropriate values
tracker.addCollider = true; //you can set appropriate values
tracker.spacesCamera = Camera.main; //or anyother appropriate Camera
tracker.nearPlaneValue = 0.3f; //you can set appropriate values Camera
tracker.farPlaneValue = 1000f; //you can set appropriate values matching the Camera
- If you control the visibility of an asset without deactivating or destroying its associated GameObject. Make sure you add that condition in the
Update()of the Tracker script. Ensure thatspacesEngine.AssetUpdate(gameObject,spacesCamera,assetId,nearPlaneValue,farPlaneValue,is2D);is called on every frame only when the Gameobject is visible/active/rendered.
Example Just for an example, Lets say you scale the asset up to show it and scale it down to zero to hide it, while keeping the GameObject active. In that case do something like the follwoing, for Spaces Engine to account for it.
bool CheckScaled(RectTransform rectTransform){
    if (rectTransform != null)
    {
        // Check the localScale in the X and Y axes
        Vector3 scale = rectTransform.localScale;

        if (scale.x > 0f && scale.y > 0f && scale.z>0f)
        {
            return true;
        }
        else
        {
            return false;
        }
    }
    else
    {
        return false;
    }
}

void Update(){
    if(spacesCamera!=null && assetId!=null && spacesEngine!=null && CheckScaled(GetComponent<Image>().GetComponent<RectTransform>())) //you can add any condition based on your requirements.
    {
        spacesEngine.AssetUpdate(gameObject,spacesCamera,assetId,nearPlaneValue,farPlaneValue,is2D)
    }
}
Loader
Standard Drag-Drop
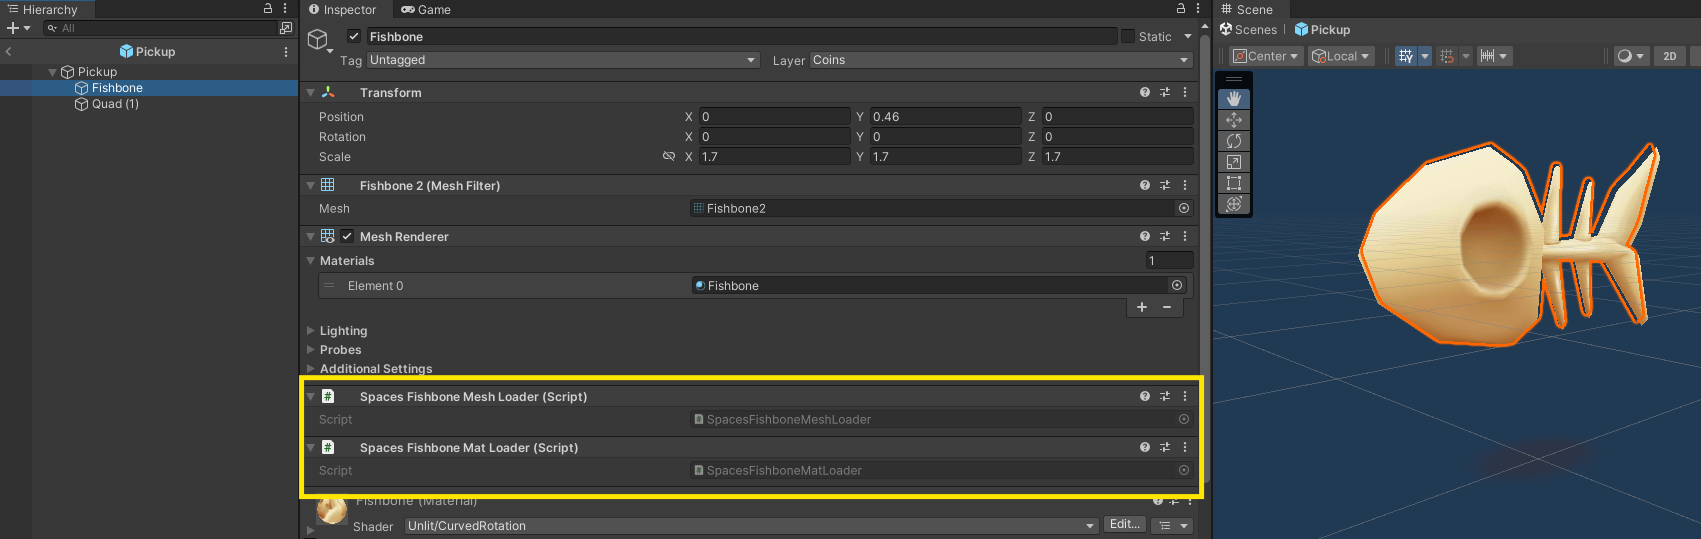
We will be attaching all the Asset Loader scripts to the respective asset Gameobjects.
Each asset may consist of multiple GameObjects, each responsible for rendering different components of the asset.
Typically, a GameObject will render a specific set of asset components, such as: like Meshes, Materials, Sprites etc.
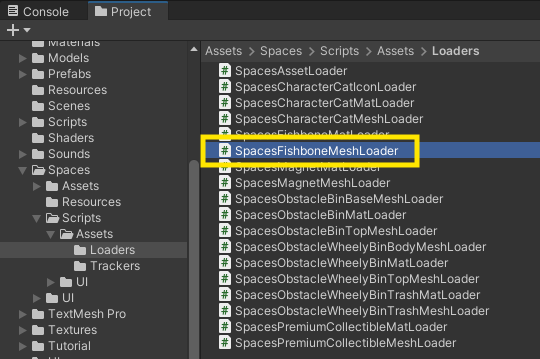
- Locate the Loader Scripts:
- You can find it in the following directory:
./Spaces/Scripts/Assets/Loaders.
- Attach the Loader Scripts:
- Simply drag and drop the relevant loader scripts onto their corresponding GameObjects. You will have to modify the script based on where you will be assigning the asset.
- Modify the Scripts as Needed:
- Depending on how you plan to assign the asset, you may need to modify the scripts to fit your specific requirements.
Your Loader script will look similar to this. You can access the asset by using the line (<AssetType>)asset;
public class SpacesBridgeLoader : MonoBehaviour
{
    SpacesEngine spacesEngine;
    void Awake(){
        spacesEngine = new SpacesEngine(SpacesController.GetAPIKey(),SpacesController.env);

        if(spacesEngine.IsCampaignActive()){
            var (asset, isValid) = spacesEngine.FetchAsset("SpacesBridgeMesh");
            //Fetch your appropriate component
            // e.g. MeshFilter meshFilter = GetComponent<MeshFilter>();
            if (isValid1)
            {
                //(Mesh)asset; //Use this to assign the asset
                //e.g. meshFilter.mesh = (Mesh)asset
            }
            else
            {
                Debug.LogError("SpacesBridgeMesh: MeshFilter component not found or asset not loaded");
            }
        }
    }
}
NOTE - In certain cases Sprites are grouped together as a Sprite Atlas and accessed from it, even though none of your assets would have Sprite Atlas as your components. This is done to achieve quick loading times in certain cases
Let me explain what the Loader Script does for a better understanding
The most critical logic is the following:
if(spacesEngine.IsCampaignActive()){
    var (asset, isValid) = spacesEngine.FetchAsset("SpacesBridgeMesh");
    MeshFilter meshFilter = GetComponent<MeshFilter>();
    if(isValid) // && other additional custom conditions as per your requirement
    {
        meshFilter.mesh = (Mesh)asset;
    }
}
spacesEngine.FetchAsset("asset-component-name") retrieves the associated asset component and returns a boolean indicating whether the asset was successfully fetched.
if isValid is true, you should assign the asset to the corresponding component in the GameObject.
We ensure that this logic is executed only when there is an active Spaces Campaign by wrapping it in if(spacesEngine.IsCampaignActive()).
This entire process runs only once, either in the Awake() or Start() before the first frame is rendered.
Before assigning the asset to any of your asset components, you must cast it to the appropriate component type. For example:
meshFilter.mesh = (Mesh)asset;.
Custom Addition
In certain cases, where you are programmatically assigning/loading asset componets. In that case you will have fetch the asset with
using Spaces.Unity.WebGl.Sdk.V2; //use this library to get access to SpacesEngine class

SpacesEngine spacesEngine;
spacesEngine = new SpacesEngine(SpacesController.GetAPIKey(),SpacesController.env);
var (asset, isValid) = spacesEngine.FetchAsset("asset-component-name");
and then assign it wherever you want programmatically.
Just make sure the following:
- You typecast the component to its type, before assigning the asset.
- Entire spaces asset loading logic, is enclosed within
if(spacesEngine.IsCampaignActive())
NOTE - Ensure that Spaces asset is assigned before the asset Gameobject is set active
Example
if(spacesEngine.IsCampaignActive()){
    var (asset, isValid) = spacesEngine.FetchAsset("SpacesCoinMesh");
    if(isValid){
        //asign it with (Mesh)asset
    }
    else{
        //your default assignment
    }
}
else{
    //your default assignment
}
- You can find all the
Components(asset-component-name) in\Spaces\Components.txt
Interactions
This endpoint is used by the Spaces Ad Engine to track game task completion, allowing players to unlock brand rewards during campaigns.
Interactions can vary from game to game. Here are some examples:
- Collecting gold coins or power-ups in Subway Surfers
- Eliminating enemies in Call of Duty
- Winning or losing matches
- Bursting candies in Candy Crush etc..
Essentially, interactions can include any form of in-game action or achievement. By default, all your assets can be used to update interactions. For certain interactions that cannot be linked to any asset, specific assets will be created solely for tracking purposes.
To update interactions and unlock brand rewards during a campaign, you need to call the method
spacesEngine.AssetUpdateInteraction() appropriately in your game code.
The method is defined as follows:
spacesEngine.AssetUpdateInteraction(assetId,interactionCount=1)
- assetId: You can obtain this by using
SpacesAssets.GetAssetId("your-asset-name"). - interactionCount: This argument defaults to 1 and represents the number of interactions. You can only pass an integer value here.
//Examples
spacesEngine.AssetUpdateInteraction(SpacesAssets.GetAssetId("Coin"),20); //can be used to trigger 20 coins where collected
spacesEngine.AssetUpdateInteraction(SpacesAssets.GetAssetId("SurvivalTimeTracker"),200); //can be used to trigger, that the player survived for 200 seconds
spacesEngine.AssetUpdateInteraction(SpacesAssets.GetAssetId("MatchWonTracker")); //can be used to trigger that a match has been won
spacesEngine.AssetUpdateInteraction(SpacesAssets.GetAssetId("Candy")); //can be used to that a candy has been collected or bursted.
Best Practise is to add these as static functions in SpacesController and access it universally across your game and scenes. You can find SpacesController.cs in \Spaces\Scripts
public static void MatchWon(){
    spacesEngine.AssetUpdateInteraction(SpacesAssets.GetAssetId("MatchWonTracker"));
}

public static void CoinCollected(int count){
    spacesEngine.AssetUpdateInteraction(SpacesAssets.GetAssetId("Coin"),count);
}

public static void PlayerSurvived(int time){
    spacesEngine.AssetUpdateInteraction(SpacesAssets.GetAssetId("SurvivalTimeTracker"),time);
}
You can now call these functions directly using.
SpacesController.MatchWon();
SpacesController.CoinCollected(count);
SpacesController.PlayerSurvived(time);
Next...
Let's move to Adding the Spaces UI to your game.